mfxposé #3: Gerry Webb

Monday 25 May 2009
This week we're being treated to an interview with Gerry Webb of Castaway Arts. I contacted Gerry after reading a great interview with him in Broadsword magazine dating back a few years.

Gerry is a superb miniatures sculptor based in Cairns in the tropical North of Australia and tells us:

"... My wife Carolyn and I are in the midst of a long (endless?) renovation of a traditional ‘Queenslander’ home. Between that, work and real life I'm kept pretty busy ..."

But we've been lucky enough to score an interview, some pics and few handy tips along the way...


View Larger Map

INTERVIEW

Daniel: How long have you been sculpting miniatures?

Gerry: About 20 years or so, originally just a few for fun, but seriously for mass production for over 10 years.

Daniel: What first inspired you to become a sculptor?

Gerry: A few friends asked me to make some figures for them, types not then available. I'd done some conversions and was keen to have a go at scratch building. The key step was finding a mouldmaker who could turn the master figures into production moulds.

Daniel: Which artist in your field do you admire most and why?

Gerry: Tom Meier, The Perry twins, Richard Ansell's work on the Minden Miniatures range. I like a slim, in scale sculpt, with life-like proportions. Of course there are a whole bunch of factors that get in the way. For example, thin items have to be accentuated so they'll cast successfully, plus a lot of folks prefer the exaggerated style in various degrees.

Daniel: What was your favorite project to work on?

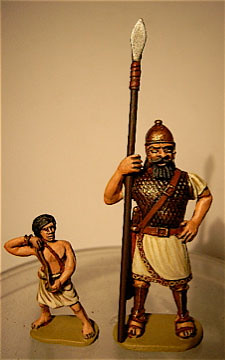
Gerry: That’s difficult to answer, my current project is always my favorite. In the Ancients I have an interest in early, Biblical types.

David & Goliath by Greg Blake 2

Daniel: What was your hardest project to complete?

Gerry: Possibly the Ark of The Covenant set, my first venture into brass sheet work. The lid actually fits on the main box. I probably should have made it as one solid piece, that would have been much easier.

Daniel: What are your favorite armies?

Gerry: I have to say colonials. Since turning to this dark side I haven't looked back. There is simply so much to do, it's endless. Every time I even look like running out of subjects, someone comes forward with an interesting, new subject they've been researching.

Daniel: What armies or ages would you like to sculpt in the future?

Gerry: I’m still on the Colonials theme, there are lots of subjects waiting in line there. I'm currently working on additions to the Chinese and Indian ranges. I would like to have a go at Seven Years War but it’s on the back burner for the moment.

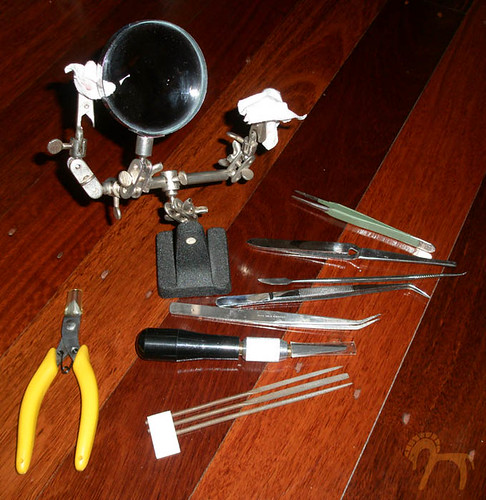
Daniel: Where do you source your materials and tools from?

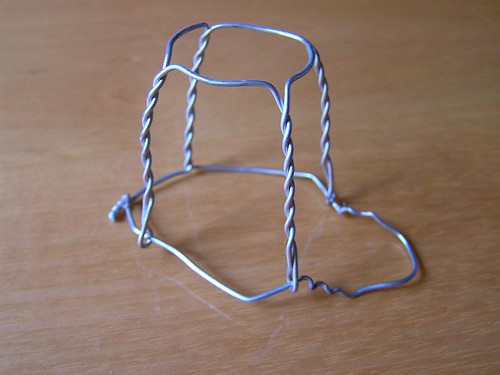
Gerry: My favorite sculpting putties are Green stuff, brown stuff, and milliput. Green stuff is great for clothing but it has a 'bubblegum' texture when it sets. Brown stuff sets hard and can be filed and sanded. Jeff Valent Studios in the USA is my usual source for Green stuff and brown stuff. Wire armatures are mainly made from paper clips, or champagne bottle wire (which is a lot more pleasant to source).

Champagne Wire Sculpture Step 1

I have some old dentist tools, and some more recent purchases from the Army Painter range.

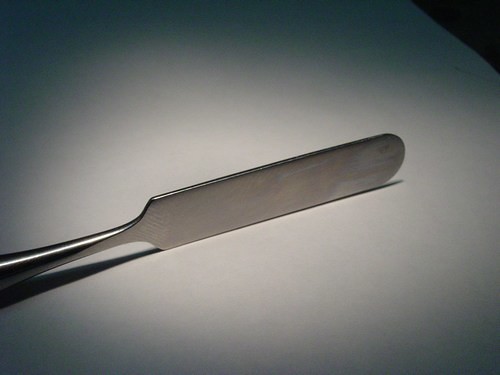
Daniel: Do you have any custom-made or special equipment for sculpting?

Gerry: My most used tools are home made. The first is a large sewing needle stuck in a brush handle, the other is a cut down wooden paint brush handle, whittled to a semi-rounded shape. These, and a dentist spatula do 90% of the work.

acrylic spatula

Daniel: What tips and tricks can you offer our readers?

Gerry: Give it a try, and keep trying. Hide your less successful sculpts in a bottom drawer, and show off the ones you like.

In the early days I had some masters break in the moulding process, simply because I hadn't made them strong enough. I learned it's no good making great detail if it's not on a strong armature and base. That's why I use paper clips, they're tricky to shape, but won't give way in the moulding press. I'm also using a lot more brown stuff/milliput to form the basic figure, before finishing the surface detail with green stuff. It makes a much stronger master figure.

These days there's on-line information that will teach you all you need to get started. Sculpting is no longer a mysterious art. A Google search is a good place to start.

Daniel: What's the best aspect of your job and the wider industry?

Gerry: That's easy to answer, I have to say the friendships formed, worldwide. I'm in regular contact with creative, helpful and enthusiastic people everywhere. I don't get to meet them all face to face, and others I only get to meet occasionally, but there is a great sense of sharing and camaraderie.

It's fun to talk to folks who have our miniatures, and find out how much they're enjoying them. Sometimes they put them to very creative uses that I hadn't dreamed of. I also enjoy comparing notes with others in the business, discussing the merits of various materials and techniques. That's where a lot of my tips and techniques came from, but in the spirit of fairness it has to be a two way exchange.

Finally, I have to give credit to Nic Robson, and the rest of the gang at Eureka Miniatures, including Rob Walter of Eureka USA. Nic is a mould maker without peer, and has been very patient with some of my more impractical designs, requests and deadlines. Without such helpful and generous people none of this would have happened.

mc1 painted

UPCOMING: Thanks to Gerry we've kick started a series of posts covering sculpting - mainly as a result of all the requests we've received from readers.

NEXT: Back to Materials and a few other overdue posts ...

Materials #4: Terrain Basics

Monday 4 May 2009
There's so many different ways you can build terrain - and we're talking everything from trees and landscapes to water effects, mountains, buildings and general set design.

As you read and saw back in mfxposé #1 with Giuseppe Borzone, terrain and buildings can be constructed using almost anything.

But with this post we're going to look at some of the more basic materials you'll need for this sort of work - both off-the-shelf stuff and custom-made.

SOME RESOURCES...

Games Workshop have been selling their "How to Make Wargames Terrain" books for some time now. Here's a scan of my old copy, I think I bought this one around 2002:

HowToMakeWargamesTerrain1996

The updated version currently on shelves is available here and looks like this:

HowToMakeWargamesTerrain-New

One of the great things about the book is that it covers a broad spectrum of terrain tips and techniques that can be applied to projects that are not solely for wargaming and table-top game use.

There's a decent amount of ideas on what alternative materials you can use to create walls and rockery, from cork tiles to bits of cardboard and off-cuts of expanded polystyrene. All these sorts of materials can be sourced from your regular hobby shops like Art on King, HobbyCo, Castle Hill Hobbies, and so on. You'd be surprised what you'll find at places like Barnes and Adelaide Moulding & Casting Supplies even though these guys specialise in areas like film industry miniature effects and prosthetics work.

Online Tutorial: Check this out: Tips & Tricks 9: Designing Rocky Landscapes

DVD Tutorials: I bought this Woodland Scenics DVD at Tin Soldier for around $9 bucks during a sale a few years back. I'll review this and blog about it at some point, so stay tuned.

WoodlandScenics-YouCanDoItDVD

MATERIALS

All the usual suspects are listed as must have items for terrain building in the Games Workshop book. I'm going list them here along with a few extras:

Balsa Wood: popular for modelling material cause it's light and easy to cut. You can use this for your timber buildings, bridges and so on. File and cut pieces to shape and paint them with your undercoat, then base colours and drybrush for good effect.

Modelling Clay: I use DAS but there's plenty of others out there. When it's exposed to room temperature air it will dry hard. Store it in a zip-lock bag to keep it from drying. You can do a whole bunch of things with this sort of clay and can model an endless variety of shapes. Use any number of items to create surface texture and shape (old brush heads, tools, sticks, twigs, forks, spoons etc...). You'll even find ready-made moulds at places like HobbyCo. Even though they're not specifically made for DAS clay modelling, it works just as well in my experience. Note that it will crack if you let it dry too quickly. I like to also use Green Stuff for finer details and touch-ups.

Here's an example of a rough job with DAS for quickly adding some weight to the base of a top-heavy model:

mfx,P2130009a

Expanded Polystyrene: You'll find this stuff everywhere, try not to chuck any of it out if you can help it. I've noticed more and more packing polystyrene is unsuitable for model making. Particularly the ones that look as though they're compressed balls of polystryrene. They're difficult to cut and shape as required. The stuff you find inside boxes carrying electronics and computers are great. Some of the shapes will inspire unusual dungeons, castles and sci-fi docking bays. Note: only use water-based paints and glues as others can melt it. It's difficult to work with for larger projects and not as sturdy as corrugated cardboard, but you can use polystyrene to "block" out your basic shapes (crumbled newspapers and masking tape works great for filling out areas, particularly for mountain ranges). Then you coat it with your filler, PVA/Sand mixture, DAS clay or other material for surface detail. Be sure to check out Reverse Garbage for some massive amounts (and sizes!) of polystrene shapes.

Cork Tiles: Hardware stores and hobby shops supply these. I've never really had to use these, but they're great for bases and other more sturdier walls that you may need for large castles and so on. They're easy to cut and glue together.

Cocktail Sticks: Easy to find & a million uses.

Pumice Stone: You'll find these in places like PriceLine for around $6 or so. They're great if you smash them to bits with a hammer for some rubble and great shaped rocks. Because of the pumice surface being rough and partially porous, you can paint, ink-wash and drybrush them to get some great effects.

pumice-stone,1

I'm actually going to use this one as a megalith or cromlech-like structure in a grasslands scene with a few archer woodsmen and Celtic-style miniatures.

Comlech.png‎

Dscn5212-mane-braz_800x600.jpg

Sand: Even easier to find. Look at the different grades of sand you'll find at your nearest beach. You can find it easily enough in pet shops for fish tanks or bird cages. Mix it with PVA glue to textures your bases and other flat surfaces. Paint the required areas with PVA and then scatter with sand. Some people prefer to dip the surface into sand, others simple pour it over. I use whatever suits the specific job at the time. Once it dries paint it over, use some ink washes, let it dry and then drybrush for a nice effect. You could go with earthy rock tones, mossy stones or even a winter scene by drybrushing white for a top layer of snow. You can also mix the sand with the PVA to form a paste that can be spread on your scenes with a spatula (makeshift or bought). I prefer to just use makeshift spatulas from bits of plastic shapes cut from milk cartons and yogurt tubs. You can use this for mountains, old castle walls and ruins, river-beds and the list goes on...

Straws: Great for futuristic piping and the like, especially the bendy ones.

Drain Mesh: Used for making bonsai and looks good as dungeon-grating, along with pieces of different sizes for strainer mesh (gauze wire).

Anchorage Wire: Also used for shaping branches in bonsai creation. You need a strong, waterproof adhesive to hold the wires onto rock and other surfaces. Epoxy resin is good but takes a day or so to harden - you can use a quick-drying adhesive made in Japan specifically for use on rock plantings for bonsai.

Others: The list can just go on with things like Masking Tape, Cardboard Tubes, Corrugated Cardboard pieces, Ready-mix Filler, Corks, Plasticene, Broken Rulers and bits of wood, Twigs and dried Stems, Roots from plants (washed and dried), Bendable Wiring (all sizes and types).

twigs1

TOOLS

Hot Foam Wire Cutter: There's a bunch of different brands out there, some cheaper than others.

Assorted: Naturally your tool-kit can be made up of anything you find useful and that does the trick. Generally I only have a very limited set of "specialist" type tools that I've bought, the rest you can make yourself or wing it with similar items from bargain stores or raiding the kitchen. These ones below include a range of tweezers, mini-files, a pair of cutters, sculpting tool, hobby knife and a magnifying glass prop.

ArcaeonMiniatureFX,materials,11

Check out this link at Scrap Dragon for a well-priced online supplier of accessories for model makers.

OFF-THE-SHELF TERRAIN

There's some great off-the-shelf terrain that you can buy from places like HobbyCo and Tin Soldier. This mountain/rock piece below is from Ziterdes (from HobbyCo in the QVB Sydney). They're very light weight, have some great detail and can save your life when on a deadline or doing a last-minute rush on a job (this one's called the Rock of Raburgon).

ZieglerTerrainDesign-Ziterdes-12146Berg-Stein-von-Raburgon,1

Another good place to check for ready-made rockery is your average pet store. I generally find that the larger commercialised pet stores don't have what I'm after. Usually it's the little hole-in-the-wall type shops that have a really good variety of fake rockery for fish tanks. There's a pet shop on Burwood Rd, Burwood that I passed this morning. They've got some great pieces in there that can be modified. I'd recommend ripping off the plastic plants that they sometimes come with (and save them in your "bit-box" for later).


View Larger Map

Some of them look great just as they are. But I always prefer to give them an undercoat and re-paint or even just a partial touch-up by drybrushing the rocks, adding ink washes and then drybrushing some highlights.

GRASS

This stuff is great and you find it in the strangest places. It's ready-made interior decorator's "moss" that you'll come across in design shops and other home furnishing stores. It's perfect for speeding up your terrain building process. With this particular one it's about 8.5" inches in diameter and costs around $10 bucks. I got it on special for $7.95 at Vivalino in Balmain.

moss-vivalino2

The undergrowth along with the static flock can be bent, folded, cut and shaped however you like. I prefer to prepare a base (cork tile), then block out the hilly sections with pieces of polystrene glued firmly (or small pieces of crumbled newspaper taped down). Then lay the moss "mat" over it and use pins to pin it into the cork tile in the shape that I need.

Using a combination of pins and glue, once it's in place you can start adding the PVA Glue & Sand mixture detailed above, or ready-mix filler, to fill out sections left gaping by the polystyrene block underneath. Once it's dried give it a good undercoat and then paint it up (base colour, maybe an ink wash, then drybrush) to look like dirt and clay or rockery beneath a grassy hill. I like to add either onto the moss mat or around the edges, some Underbrush Clump-Foliage in a variety of colours, some lichen, a different coloured grass to blend with the deep green of the ready-made moss from Vivalino. This will give your scene some good tonal variety when it comes to the grasses, plants and earth associated with the composition.

moss-vivalino1

Try not to allow the moss mat to look too much like an obvious ready-made addition. Actually paint glue over portions of it and scatter a different coloured static flock grass over random sections, make sure that it blends well into the next colour and add a few clumps of underbrush foliage and snippets of lichen to mimick real-life natural growth. Search on Flickr or study images at your local library on how hinterlands, Scottish moors, plains, grasslands and natural hillsides look.

When Spring Begins Painting The Fields - Happy Earth Day -

NEXT: Terrain Basics continues with Ibigawa rocks (I promise!) and Native Australian dried plants ...