Posted by
Daniel de Lafoix
at
12:42 pmThursday 23 April 2009
Yep, I've got to get out of this habit of blogging "Materials #½" posts, but this one is a little side-step to the Terrain Basics post soon to be published.
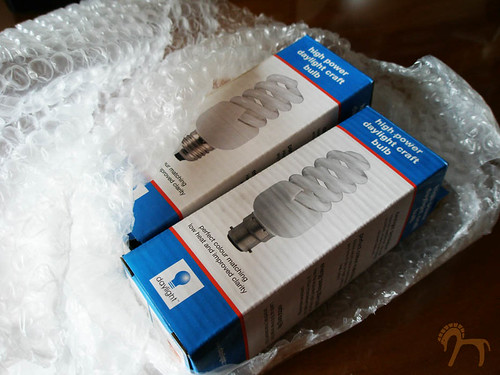
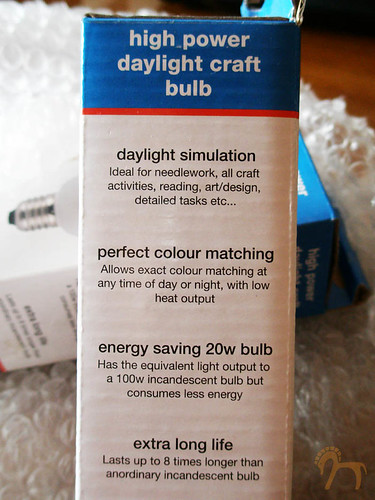
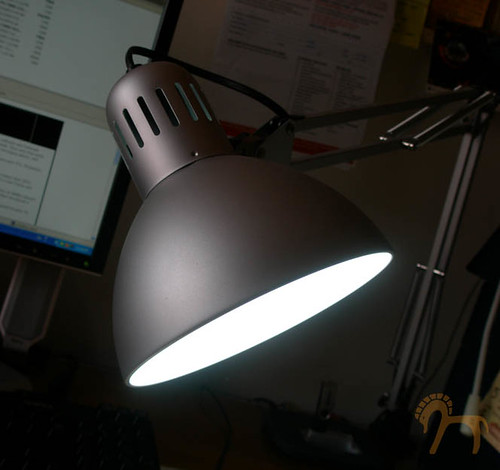
DAYLIGHT SIMULATION BULBS
I've been meaning to post about this for a while, and my two new bulbs arrived today in the mail (one's a BC bulb, the other is an ES screw-in).
Essentially, the great thing about these bulbs is that they simulate a natural northern light that is almost identical to daylight. They make colour matching more accurate than under yellow halogen bulbs which distort the colours. The light is also restful for the eyes.
Okay, so they're more expensive than a standard lightbulb, but it's well worth it. Scrap Dragon have them for a good price (only $22 bucks) and also stock a bunch of lamps in different styles.
I definitely recommend investing in them. They work great, and the light from my lamp is so much better.
Posted by
Daniel de Lafoix
at
12:38 pmWednesday 22 April 2009
Our featured artist this week is Nicolaas Smit. He's a 21 year old Sydney-based digital artist who spent most of his younger years, in the late 90's through to the early 21st century, painting Warhammer and "... creating terrains to entice my young imagination". He's ventured through a variety of sets including Orcs, Chaos, Ultramarines and LotR.
INTERVIEW
Daniel: What was your inspiration to start painting miniatures?
Nicolaas: I was always a keen artist, sketching, painting on canvas, cardboard and sticky tape was my best friend as a young kid attempting to pry open every corner of my imagination to create anything I liked at the time. I remember seeing my first Warhammer battlefield at a family friends house, the artist/owner was not home at the time and I had strict rules as to not dare touch. I remember a layout of Tyranids and Space Wolves, so tempting it was to reach out for a closer look. Back home I began creating my own "Warhammer" from cardboard, foil, bluetack was great. It wasn't till months later my parents decided to invest in my first set of Warhammer. I remember choosing a set of Ork Boyz, that's when my Warhammer days began.
Daniel: Which artist in your field do you admire most and why?
Nicolaas: As a young kid I looked up to the adults and older teens of the industry. I only purchased my sets from the Warhammer store that was located in Miranda Fair NSW so I knew the staff well and would regularly stare in awe while they painted their models within the store. I was also inspired by the many talented artists that regularly painted there.
Daniel: What was your favourite miniatures project to work on?
Nicolaas: In my later years of Warhammer I worked on a few LotR sets, I had made a few terrains in theme with the movie, my favourite being a replica of the stairs from the Moria Mines. It was my largest project created and I think spent $50 alone on expanding foam to create rock like forms. Two people were needed to lift the creation in its completed form.
Daniel: What was your hardest project to complete?
Nicolaas: I think my hardest projects to complete have been anything that has yet to be completed. Unfortunately there are a number of uncompleted projects. Mostly some overworked single sets. I also have a number of sets that became very monotonous and especially when you have 50 Orcs to paint that are almost identical across the range. Grrr!
Daniel: What are your favourite miniature sets to paint?
Nicolaas: I've always enjoyed painting my LotR sets, in particular the Rohan horseman. I enjoyed the fact that I could put so much variation with colour scheme and details for the horses themselves but also with the armour and flags the riders wore.
Daniel: What miniature sets or genres would you like to paint in the future?
Nicolaas: Something different that's not available, I'd love to see a miniature Star Wars set or something awesome like that.
Daniel: Where do you source your materials and tools from?
Nicolaas: Although I bought most of my paints and brushes from the Warhammer store I equally loved purchasing from Vaggs Hobbyshop which is still located outside of Miranda Fair, NSW. I'd occasional buy materials there but nothing beats a visit to the beach for some sand, dirts and rocks for terrains, catch some surf while you're there.
Daniel: Do you have any custom-made or special equipment for painting, sculpting and modifying your miniatures?
Nicolaas: I used to regularly use a foam cutter which I made from scratch using a coat hanger wire, batteries and some thin wire, and lots of my favourite sticky tape. [Damn, that's cool, I'll have to mock one up and give it a try, thanks for the tip - Daniel]
Daniel: What tips and tricks can you offer our readers?
Nicolaas: My favourite trick which I always shared with my mates back in the day was a technique I regularly used to create blood and gore. It involves a few drops of super glue which then you drip some watered down blood coloured red paint onto the wet super glue. The glue and paint form some chemical bond and instantly dry into some goopy looking mess. I often used it on dead Orc carcases on terrains I made, the results were never the same and occasionally you'd get some decent intestine designs and the like, oh those were the days.
NEXT: Terrain basics, more materials and finally, Ibigawa rocks...
Posted by
Daniel de Lafoix
at
12:42 amTuesday 21 April 2009
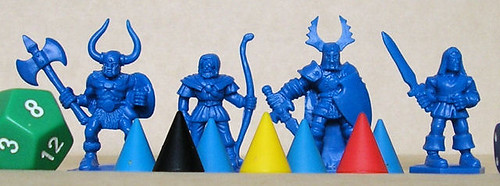
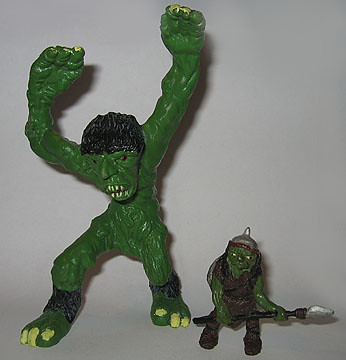
As a follow-up to our previous post on some unknown figurines, we've tracked down the boardgame, thanks to our readers.
DUNGEONQUEST
Developed in Sweden in 1985, it was released by Games Workshop in 1987 and is currently out of production. Check out this Wikipedia article on the fantasy boardgame.
Expansion sets and more figurines were created to extend gameplay, BoardGameGeek has a great listing on it with plenty of interesting images of painted and unpainted miniatures.
I've found a few more photos on Flickr featuring painted versions of the characters, including the one embedded below.
I'd love to find the time to finish painting these miniatures and will keep you posted with progress pics once I do.
I've found a bunch on eBay in the States, but I'm looking for someone in Australia.
Does anyone have this and want to swap or sell it?
Send me an email if you have just the Terrible Troll and are interested in selling it. I don't need it to be in the box-set or to come with the little goblin.
We're looking to modify and re-sculpt certain parts of the troll and paint it up. I'll definitely be posting progress images on this blog once the project gets underway.
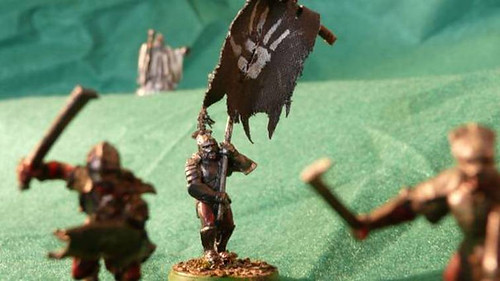
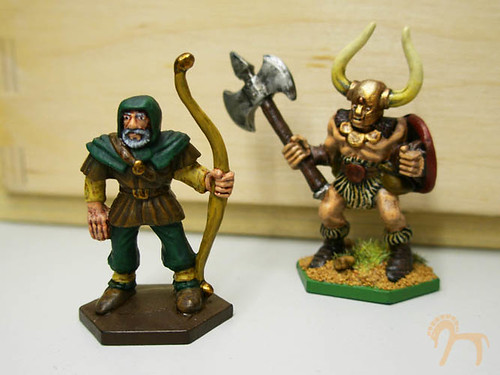
BOARDGAME MINIATURES (Updated 21/04/09)
A number of years ago I was given a set of 4 miniatures from a boardgame made sometime during the late 80's or early 90's. As you can see I've only painted two of the four. Their scale average is around 33mm, so a fraction taller than your standard Milton Bradley / Games Workshop miniatures (~28mm).
Does anyone recognise these?
I know this post is called "wanted", but in this instance I just want to know where they're from.
Posted by
Daniel de Lafoix
at
8:41 pmWednesday 15 April 2009
Now time to return to our Materials series for a look at brushes and equipment. A few people have emailed me about this so I think it's time to blog about brushes ...
BRUSHES
With the brushes it depends on what sort of quality and longevity you're after.
Sable hair Brushes
Paint brushes are available in many shapes and sizes, and are made from animal hair or synthetic fibres. There's so many different brands to choose from it is true that the better quality the brush, the more money you'll save in the long run. If you use them correctly, clean them properly and store carefully - you'll be guaranteed a brush that will last.
Sable-hair are the best quality brushes out. The Kolinsky's can go up to $50+ per brush and are the absolute best in the world. They're generally associated with watercolour painting and are made from hair taken from the tail of a sable. The hair is hard-wearing, shapes well and can hold a point. It's also got great spring and flexibility and will hold water well. You need to take care of these as they'll be your best brushes. Some artists have moral issues with the production of the brush, which I perfectly understand.
There are so many others out there, squirrel hair, ox hair, goat hair, mongoose, sabeline, etc ...
What you'll essentially want to look for are Sable-hair brushes and Taklons (more on this below).
I've bought some Neef sable-hair brushes - they work wonderfully as long as you always keep the point. I use straws of different sizes to "cap" the brushes.
TIP: Always, always keep the tips pointy. Don't ever bash the brush into the base of your jar - or leave it sitting in the jar brush-end down. This will forcibly splay your brush tip as the bristles and hairs loosen in the water. Here's a little technique my water-colour illustration teacher showed us ...
Clean it thoroughly with cold water:
1.) Just jiggle it in your "dirty-water" jar, softly rub on the jar edge a few times and wipe excess paint with a lint-free cloth.
2.) Jiggle the brush in another jar of clear water, lift it out of the jar and hold it beside you as you sit in the chair.
3.) Flick it once. The action is like cracking a mini-whip but holding the brush how you normally would hold a pen.
4.) Then gently and swiftly glide it through your free-hand using the same motion as though you were pulling off the cap from a pen in one motion - but with a loose grip.
This will flick that main drop out of the reservoir of the brush-head and make a sharp point as you glide over it. Then carefully insert it into your straw cap.
NOTE: Dry, stubborn paint around the ferrule can be softened and removed with a little washing-up liquid or shampoo, followed by a good rinse in clean water.
Taklon synthetic Brushes
Taklons are your standard synthetic-fibre brushes - sometimes called acrylic brushes. These are the ones you'll usually find miniatures artists using (particularly those not familiar with sable-hair).
They're really cheap and easy to find. You can pick some good ones up for around $8 at various stores. I think Tin Soldier and Art on King (both in Sydney) have the best supplies for what I'm after.
The problem with your Taklon synthetics is that they'll hook much quicker or split down the middle eventually (hooking is when the tip of the brush literally bends over by itself). The reason why is because it's an extracted synthetic (polyester and nylon) so it will eventually want to bend in the shape that it was first "extracted" or pulled from.
Some people would prefer to go through a dozen taklons than use one sable-hair brush. Mainly because the hair is literally plucked from the tail of a sable.
When going for a taklon brush, I've found Tin Soldier has a good range of A.J. Leeman brushes (and others) with a great pen-like grib for a handle and is particularly useful when doing fine detail. For me at least, it reduces the amount of strain on your thumb, index and middle fingers and your thenar muscle. Mainly because you're not straining to do fine strokes with a thin handle.
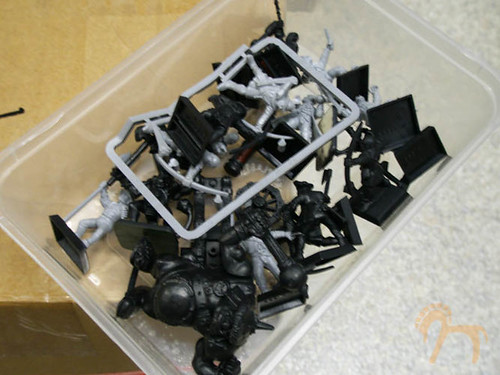
MAKESHIFT STORAGE BOXES
Okay, I've got a number of things I use for storing and sorting my materials - be it tools, paints, miniatures, etc.
Naturally cardboard boxes of all sizes are great, I use these regularly but I'm leaning towards switching everything into clear containers so I can find things more easily.
Old Asian take-away containers, the plastic sort, are great. Throw them in the washing machine (be careful they can warp with all that hot water) or wash them thoroughly in the sink.
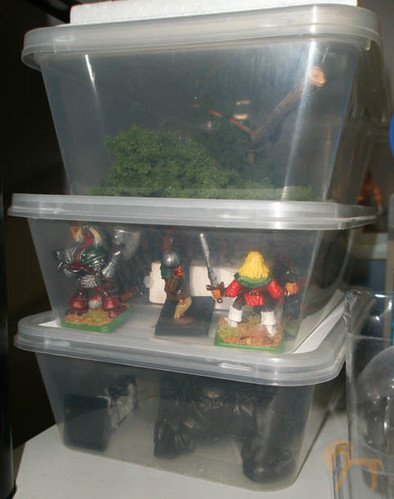
I generally use them for storing spare miniatures I've undercoated in the past.
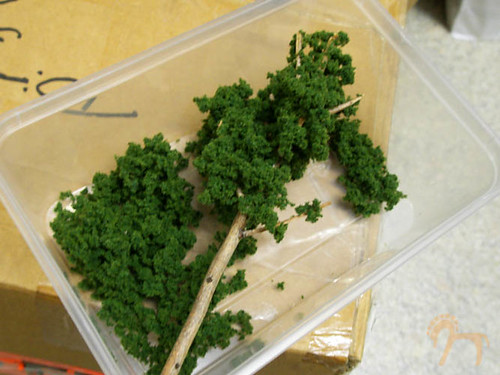
I also use them for storing foliage like the Underbrush Clump-Foliage (Medium Green) that you can see in the picture (I got this from HobbyCo). This makes it easy to spray or paint glue onto twigs and dip them into the foliage sorted in different take-away containers. We'll have a tutorial on making trees later on.
OTHER STORAGE BOXES
I've bought this great storage box from Bunnings at Rockdale for around $14 bucks, only to realise I could've gotten the same one and more variety from Kmart at Hurstville for around $8 bucks! I'm going to buy a couple more from Kmart and will post up some pics on how I've used them.
This one is great for storing ad hoc bits and pieces I use regularly.
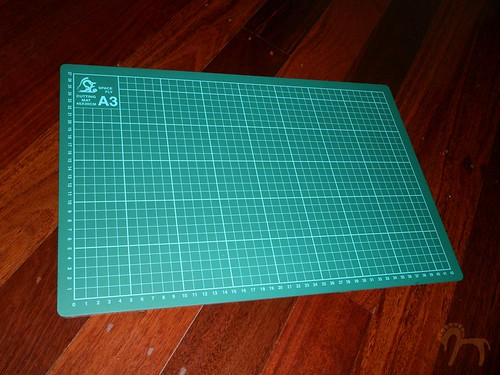
CUTTING MAT
I've got here a cheap-as-chips A3 cutting mat that only cost around $6 bucks at Roni's at Burwood Plaza in Sydney. I've seen this go for well over double (and sometimes) triple that amount. Don't bother spending top dollar for this, go down to your nearest bargain basement junk shop and see what you can find. It's self-healing and just as good as any other cutting mat.
Why a cutting mat? Well it works well just as a board for leaning on when cutting off the excesses on your die-cast miniatures. Keeps your desk a little tidier. But it's best for when you obviously cutting custom cardboard and polystyrene / foam-board shapes when creating terrain and buildings.
NEXT: Ibigawa rocks and other tools of the trade ...
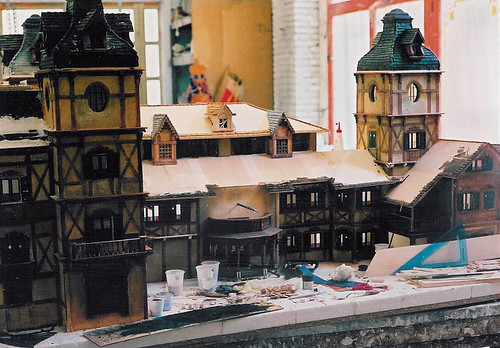
I've been in contact with Giuseppe for some time now and have looked forward to posting his interview on this blog. If you're based in Italy or Europe and would like to get in touch with Giuseppe, contact us for a referral.
Sit back, enjoy and check out the photo gallery and attached video clip.
INTERVIEW
Daniel: How long have you been creating miniatures?
Giuseppe: Since I was a student at the Academy in Milan, to study Set Design we had to construct a model, this was back in 1991/1992.
D: What was your inspiration to start creating miniatures?
G: Films, the amazing thing was that towards the end of the 70's, the movies I saw at the cinema seemed real! When I came across photos from the set with various specialists actually creating the shot in a garage or in a studio with models – and then actually filming them – I thought it was the most astounding thing I'd seen in my life.
D: Which artist in your field do you admire most and why?
G: There are so many, maybe Douglas Trumbull, but I don't consider him a colleague. He's a genius. He invented marvellous and unforgettable sequences. He's a true artist, like those from the time of the Renaissance in Italy.
D: What was your favourite project to work on?
G: My own unfinished project. Of which I only have trial tests.
D: What was your hardest project to complete?
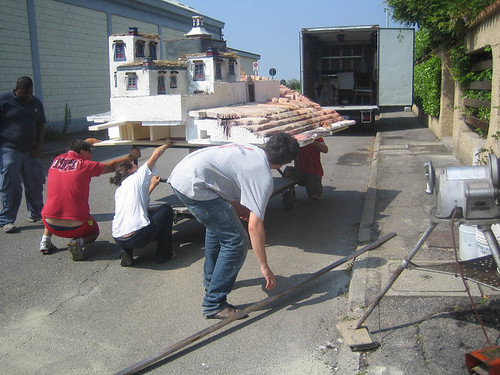
G: The last one! I had only 2 weeks to submit it. I've sent you photos of the workers loading it for transport to the film studio.
D: What miniature sets or genres would you like to paint in the future?
G: I'd like to do a Science Fiction project, like most everyone I think.
D: Where do you source your materials and tools from?
G: Anywhere, and I use anything, but above all construction materials and hardware.
D: What are your tools of the trade for painting, sculpting and modifying miniatures? Do you have any custom-made equipment?
G: You'll be disappointed. But I use a hobby-knife and pencil and naturally my own hands. I don't have equipment, I do it all by hand. I paint with acrylics and occasionally use spray-cans.
D: What tips and tricks can you offer our readers?
G: Miniatures do not have to be absolutely true-to-life reproductions. They're pictorial representations of something, just as it once was before computers, like matte paintings used in film sequences.
Naturally, you don't exaggerate the liberal interpretation, in other words you don't do action painting.
D: How do you perceive the relationship between the use of computer graphics and miniatures for special effects in films?
G: Very good, when it's entirely described in the end credits or in a specific article that talks about the film's production – as does not happen with Italian producers and set designers who declare, after having used scale model samples with lasers or photos, that it's all the product of digital technology.
D: What can you tell us about your industry in Italy and Europe?
G: Well! The British are champions, you only need to see the last 007 film! The French tend to do like the Italians, they'll use model samples and then say it's all CGI!
In Italy during the 60's and 70's we had true masters like Mario Bava, none exist today. There are two or three studios in Milan who, to create a little 20cm plant, will ask for €10,000 euros!
There are also the Slavs, they're great. But in the last film on Hannibal Lecter, filmed in Bohemia, the producer Dino De Laurentiis didn't even credit them in the titles – something that, for example, the Americans didn't do in the film Aliens vs Predator.
ORIGINAL ITALIAN INTERVIEW
Daniel: Da quanto tempo stai lavorando con le miniature?
Giuseppe: Da quando ero studente all'Accademia di Milano, per fare le scenografie bisognava costruire un modello era il 1991\1992.
D: Quale è la tua ispirazione per cominciare a creare le miniature?
G: I film, la cosa stupefacente era che alla fine degli anni 70 i film che vedevo al Cinema mi sembravano veri! Quando ho visto delle foto dei set con alcuni specialisti che creavano quelle riprese in un garage o in uno studio con i modelli e poi li filmavano mi è sembrato la cosa più stupefacente che avessi visto in vita mia.
D: Quale artista nel tuo campo ammiri di più e perché?
G: Ce ne sono tanti, forse Douglas Trumbull, ma non lo considero un collega. Lui è un Genio. Ha inventato cose meravigliose sequenze indimenticabili. È un vero Artista, come quelli che c'erano nel Rinascimento in Italia.
D: Quale è il tuo progetto preferito che hai fatto?
G: È un mio progetto non - realizzato. Di cui ho solo i test di prova.
D: Quale è stato il tuo progetto più difficile da completare?
G: L'ultimo! Avevo solo 2 settimane per consegnarlo. Ti ho mandato le foto mentre degli operai lo caricano per trasportarlo ai teatri di posa.
D: Che tipo di miniature o che generi di modelli vorrai creare nel futuro?
G: Mi piacerebbe fare un progetto di Science-Fiction, credo come tutti.
D: Dove trovi i tuoi materiali ed attrezzi?
G: Ovunque, uso qualsiasi cosa, ma soprattutto materiali edili e ferramenta.
D: Quali sono i tuoi ferri del mestiere per verniciare, scolpire e modificare le miniature? Hai delle apparecchiature specifiche?
G: Rimarrai deluso. Ma uso il "cutter" e la matita e naturalmente le mani. Non ho delle apparecchiature faccio tutto a mano. Le dipingo con i colori acrilici e qualche volta uso addirittura le bombolette spray.
D: Che consigli e trucchi del mestiere puoi offrire ai nostri lettori?
G: Le miniature non devono essere riproduzioni pari-pari della realtà. Sono rappresentazioni pittoriche di qualcosa, come lo erano una volta prima dei computers, i Matte Paintings usati nelle sequenze dei Film.
Naturalmente non si deve esagerare nella libera interpretazione, insomma non si deve fare Action Painting.
D: Come percepisci il rapporto fra l'uso del CGI e le miniature per gli effetti speciali nei film?
G: Molto bene, quando viene descritto per intero nei titoli di coda o in un articolo specifico che parla della realizzazione del film, non come avviene con i produttori e gli scenografi italiani che dichiarano, dopo aver campionato dei modelli in scala con i laser o con le foto, che è tutto frutto della tecnologia digitale.
D: Che cosa puoi dirci sull'industria delle Miniature in Italia ed in Europa?
G: Beh! Gli inglesi sono dei campioni, basta vedere l'utimo film su 007! I francesi tendono a fare come gli italiani; campionano e dicono che è tutto CGI!
In Italia negli anni 60 e 70 avevamo dei veri maestri come Mario Bava, ora non esiste più nessuno, ci sono due o tre studi a Milano che per fare una piantina di 20cm chiedono €10.000 Euro!
Esistono gli slavi, bravissimi. Ma nell'ultimo film su Hannibal Lecter, girato in Boemia, il produttore Dino De Laurentiis non li ha nemmeno accreditati nei titoli, cosa che per esempio non hanno fatto gli americani con il film "Alien vs. Predator".
NEXT: Keep an eye out for Materials #3 next week, covering tools, brushes, Ibigawa rocks and more.
Posted by
Daniel de Lafoix
at
9:51 pmMonday 6 April 2009
No exotic trips to junk-troves on the weekend, but I'd like say hi to Mitch from the Games Workshop over in Hornsby. I was over that way last week and thought I'd pop by Westfield's to check out GW. We chatted about Citadel's new washes, varnishing and undercoats.
Talking about undercoats...
PAINT SPRAYS
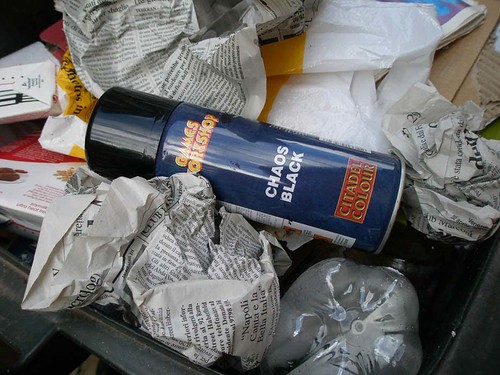
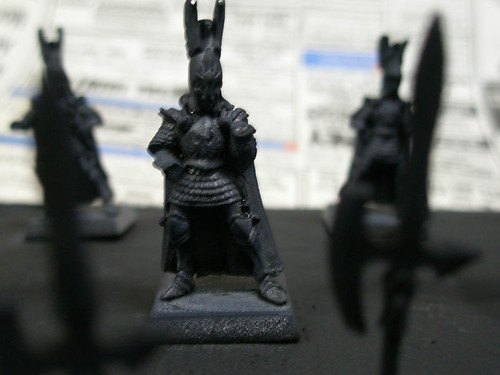
Yep, say goodbye to the last Chaos Black undercoat spray bottle I'll ever use ...
That's right, after something like 8 years on and off using this kind of undercoat spray, I've had enough of "frosting" and the can's drippiness. Okay, frosting is fixable - but dribbly nozzle problems on a spray bottle can spurt globs of paint on your fresh model. Maybe my last few cans were dodgy, but I always follow the instructions carefully and am still getting this problem.
What is frosting you ask? Well, it's just a phrase we use (not sure if anyone else does) for the white film or frost that appears on models as they dry after spraying them in humid weather, full sun or some other stroke of misfortune when doing your undercoats. This same problem used to occur with the old GW Purity Seal varnish - which is no longer sold as a result.
Now it might be fixable by coating your model with watered down Chaos Black - but doesn't this extra step of fixing the frosting problem defeat the purpose of using an undercoat spray? It's meant to be quickier and easier than painting on an undercoat. And when you've got deadlines, a spray should be saving you time.
I'm not going to give up on sprays altogether though. Send me any recommendations via mfx@arcaeon.com and I'll check them out and post on this blog. I might have a look at Tamiya primers from HobbyCo, as I started out using these paints in the early to mid-90's. Although some hobbyists have found other problems with these primers, I might try this technique of extracting paint from a spray can to then feed it into an airbrush for smooth application like the YouTube clip below ... this would only be viable for larger quantity jobs, as for only a small bunch of models I might as well hand-paint the undercoat.
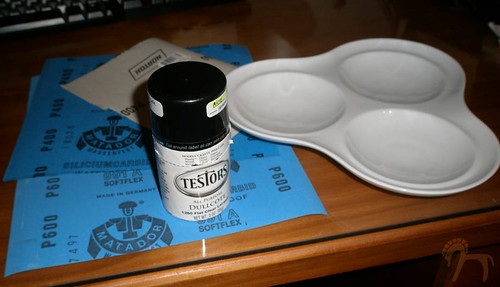
VARNISH SPRAYS
At the moment I'm using Testors All Purpose Dullcote (Flat Clear Lacquer) - and I think it's fantastic. The guys over at Tin Soldier recommended the small bottle (85g) that I bought for $11.95 back in February.
It leaves a Matt finish, which is great as I hate Gloss varnish with a passion (unless it's for a specific purpose). Give it a try and see what you think. It doesn't need too many coats, just a few outside in the air under some shade. Leave it to dry and in about 10 minutes (usually less) your model is good to go.
TIP: They also recommended a neat trick I'm going to try in the next few weeks (and will blog about it, so stay tuned). If you're going to be doing a lot of wargaming with your models and you're looking to protect them from getting chipped and scuffed: use a Gloss varnish as this is the strongest and will seal paint the best. Once dry, spray successive layers of Matt varnish (4 or 5) to get rid of the gloss finish. Make sure you let each Matt layer dry before repeating 4 or 5 times. This should leave you with a matt-varnished model that is chip-proof.
ALTERNATE VARNISHES: I've got my eye on some alternate varnish sprays that I'm going to use for this experiment. If all goes well, these could be the most economically efficient way to lacquer your creations. The Micador and Helmar brands make a full range of sprays from Fixatives (for dry media artwork) to Varnish and Adhesives.
I'll aim to use the Helmar Crystal Kote Gloss and Matt bottles (400g each!) to test out the above 1:5 ratio Gloss/Matt technique. They generally retail for not much more than $10 each. But again, I don't know how many coats are required from a Crystal Kote Matt bottle to achieve the same results when using Dullcote. It'll be interesting to compare drying times as well.
WET PALETTES
What's a wet palette? Ah yes, this is a godsend for those of you who are frustrated by your paints or custom mixes drying too quickly on the palette.
They've been around for a long time but you can make your own quite easily, customising the size to your requirements (see below). Generally, the commercially-sold wet palettes are small.
Forumla P3 (Privateer Press) sell a Wet Palette that I've seen on shelves at Tin Soldier (Sydney), online at Defiant Gaming in Canberra, and Irresistable Force (who seem to be having website problems). This one is reasonably priced compared to other brands you'd find in general art stores.
Sometimes called "stay-wet palettes" (mainly after a brand by Daler-Rowney in the UK) these trays are specially designed for acrylic paint and are developed to keep paint wet and workable for several days. The palette is a shallow tray where a sheet of water-absorbent paper, or a sponge soaked with water is slipped into the base. A sheet of palette or membrane paper is placed on top through which water passes by osmosis, keeping any paint on the palette moist. You can replace the sheet of membrane paper when it's full.
These are great because they prevent wastage by keeping your paint moist - instead of having to close the lids on your Citadel (or other) pots and re-shaking them once in a while.
It's fairly cheap, around $26 to $33 bucks, so have a look at your nearest supplier or google around for a good wet palette.
MAKE YOUR OWN STAY-WET PALETTE
A palette for miniatures painting can be improvised from a number of sources. You could even use a white ceramic tile, but make sure it's non-porous so it doesn't absorb the solvent in your paint. Cans, glass jars, white china condiment trays (like my photo above), yogurt pots, glass, plastic, enamel, melamine and the list goes on.
A stay-wet palette can be made from a photographic or baking tray. Several sheets of blotting paper need to sit beneath a sheet of grease-proof paper. The paint can be kept wet while not being used just by covering it with cling-wrap. I'll put one together and blog the results (just remind me) and compare that with another technique where you moisten layers of paper-towels in the tray using a water spray-bottle which you can get from places like Reverse Garbage in Marrickville.
It's also a good idea to try and use cling-wrap often with your palettes, it helps to keep off little (and large) bits of dust that fall down into your dabs of paint while working on a miniature.
I strongly recommend trying to work with improvised palettes, there are no disadvantages whatsoever, the costs are minimal or none, and the advantages are that they're easy to find and recycle. Hey, you'll be doing your bit for the environment and keeping your wallet closed during these difficult times.
NEXT TIME: We'll cover tools, brushes, Ibigawa rocks and more.
MFXPOSÉ: Keep an eye out for a series of upcoming interviews and exposé posts on featured artists. In the next week or so, we've got photos and footage to post from Giuseppe Borzone, a miniature effects artist from Italy with over 15 years experience in the film industry.


